
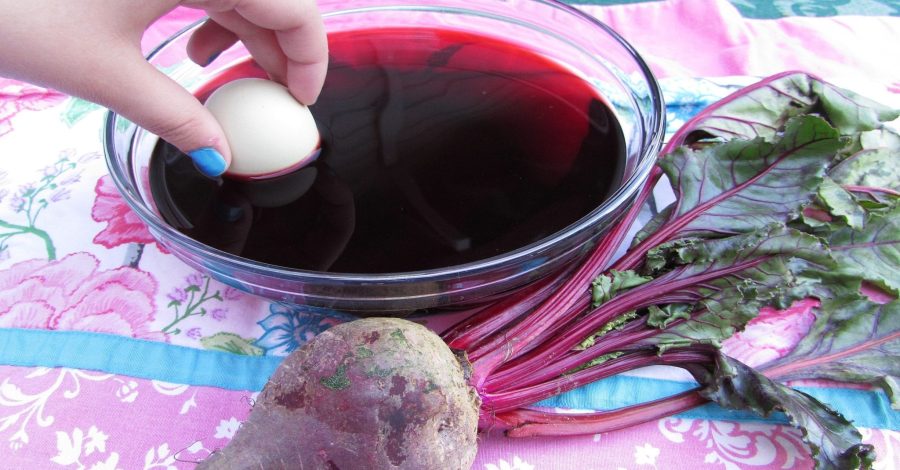
Below are veggie-dyed Easter Eggs using onion skins, berries, turmeric, beets, red cabbage, etc. The colors that veggie-dying creates on eggs is amazing!
People from all over the world have been borrowing nature’s colors for thousands of years. Chris McLaughlin, author of the soon to release A Garden to Dye For: How to use Plants from the Garden to Create Natural Colors for Fabrics and Fibers (St. Lynn’s Press, 2014), is bringing home-grown botanical dyes front and center for crafters and families who have made a commitment to a more organic lifestyle.
Naturally Dyed Easter Eggs
While some plants are ignored because they can only offer temporary color (AKA: fugitive), McLaughlin refuses to leave them behind because these colors are perfect for play dough, watercolor paints, and Easter eggs.
Creativity is the point, so please feel free to go beyond the typical white eggs that are usually used for egg dying and reach for the brown, blue, and green ones. You’ll be amazed at the beautifully unique colors that will show up!
Caution: Remember not to use any plant materials that are considered poisonous. Use only what you know to be safe, edible foods (plants) as the assumption is that the eggs will be eaten.
Easter eggs are usually naturally dyed one of two ways: in a hot bath, which means that the eggs are colored at the same time they’re being hard-boiled; or they can be dyed in a cold bath. The hot bath works faster, but the cold process may be easier if you are dyeing with more colors, because you can make a bunch of dyes up in advance. I prefer the cold method because the colors come out much more intense.

What you’ll need:
Non-reactive dyepots
Water
Stove (if you’re using the hot method)
Glass jars or bowls (for cold method)
Eggs
White vinegar
Dyestuff: onion skins, berries, turmeric, beets, red cabbage, etc.
There are many variations on making natural Easter egg dye, but this is what works for me.
Hot Dye Method
I like to make my natural dyes (simmer in a pan of water for 15 minutes or so) and then strain out the plant dyestuff so just the liquid remains in the pot. I add my eggs to the pot and add water just so the eggs are covered by about 2″ of water. Add 1/8 cup of vinegar, then bring the pot to a boil for 17 – 20 minutes. This method dyes and hard-boils the eggs all at the same time.
Cold Dye Method
Make the dyes by simmering in a pot of water for 20 – 25 minutes. Strain off the dyestuff, add 1/8 cup of water, and let the liquid cool in jars. Once the dye is cool, add an already hard-boiled egg to each dye color and leave them there for at least an hour – but for the most impressive colors, leave them in there up to 10 hours.
Caution: If you decide to let your hard-boiled eggs sit in a dye for longer than 2 hours, they need to be refrigerated for health safety. Don’t leave them sitting in the dye container on the counter for hours.
You will love the saturated, deep colors of your newly dyed Easter eggs. These surpass in color and surprise the typical varieties created with quick dyeing kits. The colors pop and swirl on these eggs – but remember the process is half the fun!
Image Credit: A Garden to Dye For
Leave a Comment