Over time, mold and mildew build up on bathroom caulk, which can be a pain to remove. It’s not only a health hazard, it’s irritating.
There are different steps you can take to remove the mold. You can use the steps below to remove it overnight or you can start fresh and actually remove the old caulking and apply new. Those steps are further down the page.
Remove the mold but leave the caulking:
Often, you may notice that mold collects at the edge of the tub, like this:
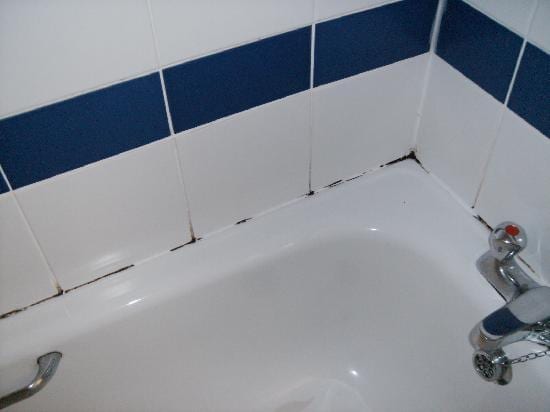
It may because the caulking isn’t the right kind or water is left there for too long. Either way, you can remove the mold with these steps:
You will need:
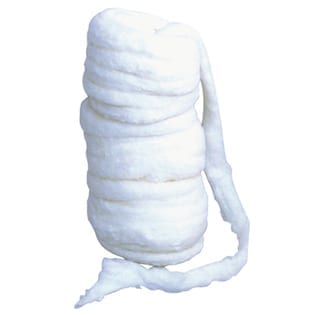
Paper Towels (or cotton coil – shown below, if you have it)
Bleach
1 pair of Disposable Gloves
Steps:
 1. Get a disposable aluminum pan or use something to pour the bleach in *avoid using plastics*. The goal here is to pour in the bleach so you can dip the paper towels in it.
2. Tear apart the paper towels and roll each one into what can only be described as a fruit roll-up (or cotton coil, shown on the right). This is so they sit on the mold easily. If you have cotton coil fine, I think paper towels work just as good.
3. Dip the paper towels in the bleach and lay them directly on the mold, pushing them into the crevices.
4. Let the paper towels sit on the mold overnight. Done!
You now have a clean, sparkly tub.
If the caulking is too far gone and it needs to be replaced, removing and replacing moldy or mildewed caulk is relatively simple. Keep in mind, though, that different types of caulk may be more or less appropriate for your project depending on your preferences for ease of application and removal, the substrate and the mold levels.
Start fresh! Remove the mold and the caulking:
There are different types of caulking, so let’s take a look.
Acrylic caulk is the best caulk for repelling mold and dirt. Acrylic caulk can be either water-based or siliconized, which allows you to choose the best application, substrate and durability preferences. All acrylic caulks have good adhesion, flexibility and lifespan, and are designed to not only repel mold but also to remain bright white over time. All-acrylic water-based caulks are especially versatile since they can be painted with many different types of paint. Keep in mind that acrylic caulks tends to be more expensive than other types of caulks.
We use Silicone-Based acrylic caulking and it works great.
Generally speaking, silicone-based caulks are the best caulks to use in mold-friendly environments like bathrooms. Since silicone is inorganic, it is extremely mold, mildew and water resistant. Additionally, silicone-based caulk is idea for substrates commonly found in bathrooms such as ceramic tile, porcelain and glass.
Follow this article for tips on removing the caulking.
Removing mold from grout
Removing mold from grout is a little easier. All you need is an old tooth brush and bleach. If you want to try lemon juice and baking soda first before resorting to bleach, it might just work for you but sometimes, if the mold has been sitting there for a long time, bleach might be the only trick.
Just make sure to open a window and turn on a fan when cleaning. You won’t need to do this often but when you do, tackle it with all you got to get the job done quickly.
Modern Day Moms
Modern Day Moms is an award-winning publication centered around motherhood that is real and unfiltered. Basically, we don't sugarcoat anything and aren't afraid to tell you the truth. Let's be best friends, we will make you feel more normal.



6 COMMENTS
Presvytera Magda
10 years agoI am so grateful for this tutorial! I had been told years ago that this kind of mold was impossible to remove from caulk. Eight hours after I put bleach-soaked rags on, I have beautiful caulk!
Modern Day Moms
10 years ago AUTHORSo happy to hear!
Suney Hill
10 years agoThanks for your advice. This smiple solution saved us from having to spend a small fortune calling someone to do it. We just removed the old nasty stuff, soaked it with bleach then re-caulk the tub. Bam! Done.
Sharmin
9 years agoI want to personally thank you for this trick. I did not think it would work, but today I woke up to a surprise. I wish I had taken before and after pics, but I honestly thought that it would not work. I will be sharing this with everybody.
Modern Day Moms
9 years ago AUTHORGreat to hear!
Joel
9 years agoGenerally speaking, bleach (oxidizer) is safe for most plastics. Metals like aluminum, however, react with bleach, dramatically in some cases. A disposable aluminum pan shouldn’t be cause for concern, however.
Nice post, though!